Thursday, June 30, 2011

Almond Blueberry Coffee Cake

TasteSpotting.  If you haven't been on their website, you need to look at it.  So many beautiful pictures and such variety of recipes.  Today I have fresh blueberries to work with.  A search on TasteSpotting gave me lots of options.  I clicked on a muffin recipe, and from that link I clicked on a couple more, only to end up with a recipe I'm not sure where I got.  No matter, really, because I made so many changes to the recipe. 

The original recipe called for 4 eggs; I used 2 eggs, and 2 tablespoons of ground flax seed mixed in 6 tablespoons of warm water.  I am not sure I care for the flavor that flax seed adds, but I do care for the good nutrients it contains.  The recipe also called for 3/4 cup of sugar; I used 1/2 cup of honey and 1/4 cup of sugar.  I also added blackstrap molasses, which isn't called for in the recipe but I look for any opportunity to add it to a recipe.

Also, the original recipe called for sprinkling 2 teaspoons of sugar over the top before baking.  I forgot that step, and about 10 minutes into baking I remembered it.  I pulled the cake out and put 2 tablespoons of sugar on it.  Then I read the recipe again and saw that I had gone way overboard on the sprinkly sugar.  Still, considering the flax seed issue I have, maybe that was a lucky accident.
 
Finally, the recipe called for almond extract.  I don't have any on hand, so I used vanilla extract.  I'm sure almond extract would have given it a stronger almond flavor.  The finished cake has a nice almond flavor even using vanilla extract.

Here is what the recipe looked like after I got finished messing with it.  It hit a few wet spots on the counter, too.


I still have plenty of blueberries left and can't wait to eat them.  Enjoy!


Almond Blueberry Cake
Serves 10

Ingredients:

1 cup almond meal
1 ½ cups white whole wheat flour
2 tsp baking powder
½ tsp sea salt
2 eggs
½ cup honey
¼ cup sugar + 2T sugar for topping
2 T ground flax seed mixed with 6 T warm water
½ tsp vanilla extract
¾ cup unsalted butter, melted
1 T blackstrap molasses
½ cup fresh blueberries

Preheat the oven to 325 degrees F. Butter and flour a 9 inch spring-form pan.

In a medium bowl, combine the almond meal, flour, baking powder and salt. Stir to combine and set aside.

In a large mixing bowl add the eggs, the flax seed in water, the honey and sugar. Using the whisk attachment beat for about 3 minutes until it is light and fluffy. It should increase in volume as well. Mix in the molasses and vanilla extract.

Slowly alternate adding the butter and flour mixture, blending after each addition just until combined. The batter will be thick.

Pour the batter into the prepared pan. Evenly distribute the blueberries on top of the cake, gently pressing each into the batter. Sprinkle on 2 T of sugar.

Bake for 35 to 40 minutes or until a toothpick comes out of the center with very few crumbs and the sides pull away from the pan. Place on a cooling rack and cool in the pan for 10 minutes. Remove the spring-form pan and cool to room temperature.


nutrition facts
based on a 2000 calorie diet

Sunday, June 26, 2011

Garden Pictures

I love our gardens.  We have 3 huge flower beds, a largish vegetable garden, the peahouse (now featuring cucumbers and cantaloupes), and random melon plants by the shed.

The yellow and orange cosmos came up this year from seed spread by the cosmos I planted last year.  To the right, on the pergola, are the zucchini plants.  I trimmed them way back today and pulled out one of the plants.  The leaves that were covered in mildew all had to go.  We've had 2 zucchini off these plants; today I saw another one coming along!

To the left, peeking into the picture, is the big shade garden under the Bradford pear tree.  I've put lots of plants in there - astilbe, hosta, bleeding heart, forget me not, ice plant, and a few more.  One day that garden will be filled completely with flowers.

More cosmos, chrysanthemums, and a little more of the shade garden.  The gardenia bush on the right is in full bloom but I can't prove that by this picture!

Gladiolas coming up, gerber daisies, random volunteer yellow flowers that I've forgotten the name of, snapdragons, and my giant red poppy seeds went in this garden too.    To the left you can see one of the broccoli plants that turned out to be a cabbage.

 I have two tiny poppies that never seem to get any bigger.  This is, however, my most successful attempt to grow poppies from seed.   The most I've ever had before were stringy seedlings that died almost immediately.  They are right in front of the white plant stake in the bottom left-hand corner.  You can sort of see one of them.  I have high hopes for these two little plants!

Down the fence from the poppies and cabbage is this eggplant.  We have a fruit on it now and several flowers!

The cucumbers love their location on the front fence.  The roses need serious pruning.  The idea horrifies Greg, but it must be done.  I'm gradually trimming them back and trying not to draw attention to myself.


A better view of the shade garden.  I planted some tulip bulbs in there, given to me by a neighbor.   I can't wait to see what color they are when they come up next Spring. 


These pretty petunias hang right outside my office-room window and I can see them from where I sit. 


After we pulled all the peas out, the cucumbers and melons went crazy on the peahouse!  That cucumber in the middle is hanging on the inside.  I'm trying to poke all the babies through, so they'll hang inside.  So convenient for picking!

These are some melon plants on the peahouse, with cilantro along the bottom.  The baby melons are tiny and fuzzy, very cute.  I can't wait to eat them.

Saturday, May 28, 2011

It's A New Dawn and We've Got Peas

One of my soul mates, Jamie, is a psychic and she has her own online radio show.  She is a natural for radio, with her confident voice and happy laugh.  Every week she brings new insight, and sometimes guests, to her broadcast.  This week, I was one of her guests.  My NutriMirror BFFs Lynn and Kel were guests, too.  We talked about NutriMirror and had a wonderful time getting the message out.  Being on the radio was a fun experience.  It was not only fun; after the show, the three of us were all buzzy from the incredible energy of doing something new and wanting to do it some more!  Based on Jamie's reading for me this week, and previous readings, we three are going to become even more familiar with online radio when we launch our own show.  Right now we are in the mulling it over stage.  If you'd like to hear us on It's A New Dawn, click here:  12Radio It's A New Dawn   Our show was on May 24 but I encourage you to listen to all of Jamie's shows - they are worth it!

The garden took a hit this week when hurricane-force winds blew through on Tuesday evening.  There has been very little rain around here this spring; the weather maps show rain all around us but we have only had a couple of cloudbursts.  On Tuesday we had the high winds and a splattering of rain, not enough to really benefit the garden.  The winds knocked over our big tomato plant and the peas that were taller than me.  We got them all stood back up, and Greg rigged up a network of twine that's keeping things upright.  We have peas now!  Not enough to pick for a dinner of peas, ham and shrimp, but we will be there soon.


Peas!  May 27, 2011
 The peahouse is progressing.  Next year we will reconfigure and plant the peas inside instead of outside, so they will naturally cling to the chicken wire as they grow right up to it.  This year we've been training the peas onto the chicken wire, hooking the little tendrils on and in some cases tying the plants on.  These are about thigh-high now, and have peas on them too!


2011 peahouse, the first of many
 The thing is, we planted two kinds of peas:  English peas, and sugar snap peas.  We didn't bother keeping track of what was planted where, so at this point I'm not sure if we are supposed to eat the pods or shell them.  Greg says we will know when the time comes.  I hope he's right.  (He usually is, as I've learned over our 23 years together.)

Our gardenias are starting to bloom now, too.  I would love to chop these bushes down to about a foot tall after they finish blooming.  I am a big believer in pruning.  Many people consider pruning to be bad, because they like the look of overgrown ungainly plants.  I prefer the way things get all lush after they've been pruned.  Right now we will just enjoy the heavenly fragrance of the gardenias.  Between the gardenias and the roses, when the breeze is just right it smells like heaven in my front yard.


The blossoms only last a couple of days but the bushes are loaded with buds
 Every year we like to grow a vegetable or two that we've never grown before.  This year we have beets, broccoli and onions.  The beets are leafed out and looking good, but not near ready to harvest.  We assume we will know when the broccoli is ready; not yet, but the plants are big and healthy.

Always wondering what the next unraveled leaf will reveal!
The onions were weeded this morning after I saw this picture!
 I've already picked one onion, to use in a delicious tomato and cucumber salad.  The recipe was posted on NutriMirror by Christinediane and it was so good I'm going to link to it.  I hope she doesn't mind!

Tomato, cucumber and feta salad

The recipe didn't call for onion, but since I knew my onions were big enough to eat I decided to add one.

This year we have a lot of volunteer plants coming up from ones we planted last year that seeded for this year.  Nasturtium, cosmos, and zinnias are everywhere.  I noticed something growing by our rosebushes that was not there last year, and that I did not plant.  I don't know what these sweet little purple flowers are!  If anyone does, please let me know!


Mystery Plant
 When we had to move our fence last month, I dug out the cucumbers and moved them to the front yard.  They are really happy there and we have a few tiny cucumbers already.


See it?  Right under the yellow flower.
 We have zucchini and a cantaloupe about the same size.  So cute!

Sadie stays in the yard with me while I'm puttering around.  She wanders around smelling everything and randomly barking.  My sweet Sadie is 13 now.  I hope she'll be around for a few more years; in the meantime, I am cherishing every minute with her and taking lots of pictures.  She fills a very large spot in my heart.  One of these days I'll get around to writing her story.  It's very interesting, involving the front page of the Bristol, Virginia newspaper and a journey from golden retriever rescue in North Little Rock, Arkansas to Leesburg, Virginia, at the tender puppy age of six months. 


Sadie on Patrol
 It's Memorial Day weekend, the start of beach season here and the end of my trips to the oceanfront until September.  I can't take the crowds, the parking meters, and the drunken revelers everywhere.  The beach is so awesome in the off-months, when it is possible to be the only person on the beach for miles around.  Happy weekend everyone and thank you to all of our service men and women.  It is great to be free and I am grateful to everyone who keeps that possible.

Saturday, May 7, 2011

Strawberry Pickin' Day

When the strawberry farms tell us it is time to pick our own, Greg and I are usually the first people out there, the minute they open on a Saturday morning.  We drive out to a part of Virginia Beach that is still country, good old Pungo.  Pungo has an annual Strawberry Festival.  We attended the festival one time and vowed never to return.  Too crowded, too hard to park and unpark, just too much.  We have yet to go to the Peanut Festival in nearby Suffolk and we have lived here for 11 years.  I have a love/hate relationship with Mr. Peanut and should probably go to the Peanut Festival at least once.  I'll put that on my bucket list, right after "learn to speak Spanish."

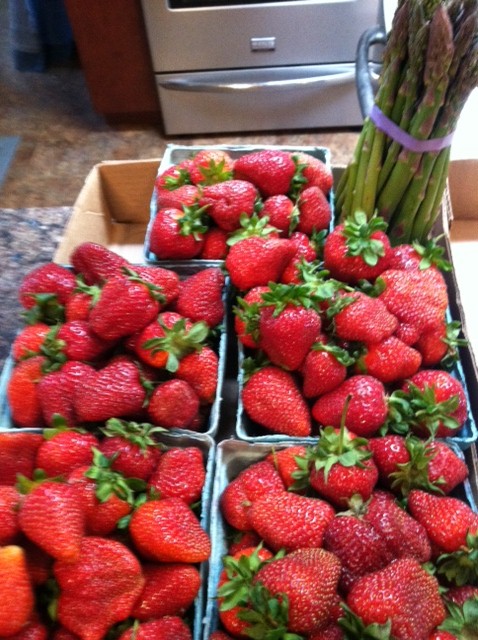
So today is Strawberry Pickin' Day.  I had a hair appointment this morning, and Greg was helping a friend decide if his bathtub is cracked, so we didn't get out to Pungo at our  normal early hour.  We didn't get out to Pungo at all.  We drove down the street about 2 miles to a little farm stand and bought 5 things of strawberries.  I don't know how big the things are - a pint or a quart or something.  You can see them in the picture.  We also bought some fresh-picked asparagus, which I will roast to go with dinner tonight.  Yum.


Locally grown strawberries and asparagus
 Then we went to the grocery store to buy ice cream and whipping cream and some kind of cake-like item to put the strawberries over.  We usually buy the little spongecake cups; last year they came in chocolate too.  We discussed the possibility that there would be no little cakes at the grocery store, much less chocolate ones.  Greg said his mom always served strawberry shortcake over big Bisquik biscuits.  I said yes, and I could never stand that.  I told him I realized he grew up eating strawberry shortcake that way, and I grew up having it over pound cake, or the little spongecake cups, so I understood how you get attached to a childhood favorite.  I offered to make a sponge cake, even a chocolate one, but in the end we just went to the store.  We bought a pack of the little spongecake cups, and a pack of little angelfood cakes for me. 

Greg has been working like a lumberjack all morning.  When we got home with the strawberry haul, he wandered off to take a nap.  I got started getting all these strawberries organized.  First, I made some chocolate-covered ones.  I just picked some big berries, and melted some Ghirardelli chips in the microwave, and went to work.  Look!


Guess how many are left?
After making the chocolate covered strawberries, it was time to make strawberry shortcake sauce.  I filled a big bowl with water and put the strawberries in it, to rinse off any bugs.  One bee and two inchworms came off, and I hope that was all of them.  Sadly, they died, and I feel guilty about that.

Years ago, one fine evening when I served strawberry shortcake to my father-in-law, he went off on a rant about how there's never enough sauce.  Not just  my sauce, nobody made sauce right.  There's just never enough juice and the berry-to-juice ratio is always wrong Wrong WRONG.  My usual method was to clean the strawberries, slice them into a big bowl, and sprinkle sugar all over them, stirring them occasionally until a sauce formed.  To my knowledge, that was the accepted way.  After his dad's rant, Greg and I decided we were going to make the sauciest strawberry shortcake sauce the world has ever known.  Our first attempt was a winner.  We sliced half of the strawberries, and put the other half in a blender, pureed them, and poured them over the sliced berries.  Over time I've perfected this method and now when I puree the strawberries, I add a cup of simple syrup.  Luscious, plenty of sauce, never any complaints.

Oh, anyway, after washing all the strawberries I laid them out on clean towels on the counter, dried them pretty well, and got to work cleaning them.  Really dark ones went into the blender.  Pureeing them makes kind of a light pink colored sauce so I try to use the darkest ones to get a darker sauce, because I think it's prettier.


Beautiful clean strawberries
 While I was prepping the strawberries I made a simple syrup of 1 cup sugar in 1 cup water, over a low heat until the sugar dissolved.  That needs to cool down before I can make the sauce.

When I had cleaned most of the berries, and had a blender full and a big bowl full, I put the remaining berries on a sheet pan and they are in the freezer.  They will go into a plastic bag and be used in a future recipe.  I love that there is no waste with this purchase.  The strawberries will be eaten, the tops will go into the compost, the little blue pints or quarts or whatever are biodegradable so I can use them in the garden. 


Nothing is wasted
There is a skylight right over the counter where I usually take pictures.  The sunlight on the sliced strawberries makes them look like orange peppers.  Just as a little reminder, this is not a photography blog.  We have two digital cameras; one of them, the battery is always dead soon after I recharge it; the other one, I somehow turned off the flash and don't know how to make it come back.  The manual is around here someplace (note to bucket list: learn how to turn the flash on and off).


Puree the strawberries and simple syrup
Now comes the fun part. Put about 1/4 a cup of the simple syrup over the sliced strawberries and stir; put the rest of the simple syrup into the blender. Puree the strawberries, and pour over the sliced strawberries. (Helpful Hint:  Make damn sure the bottom is screwed onto the blender correctly.  I wasted a bunch of time cleaning up the blender and the countertop after I blended the strawberries.)

Stir, taste, swoon. These will sit in the fridge until time for dessert tonight, and the berries will soak up a little of the sauce while they sit there.
Saucy enough?


Saturday, April 2, 2011

Sundried Tomato and Feta Scones

It's 7:30am, and we've been to the grocery store, I've made Scottish Oatmeal Cakes, homemade Frosty Paws for Sadie, and Sundried Tomato and Feta Scones.  My house smells like a pizza parlor.  My kitchen is trashed. 

A dear friend of mine is turning 45 this month.  I was on etsy.com, one of her favorite websites, browsing around to see if anything caught my eye that was worthy of a 45th birthday present.  As usual, I got sidetracked when I saw a picture of scones.  I had no idea that etsy also published recipes!  Next thing you know every website out there will have recipes on it.  Yay!

I printed the recipe for the scones, entered it into NutriMirror to see what the nutritional stats were going to be like, and just about fell over.  The sodium alone was enough for an entire day.  So I got to work revising the recipe.  This involved an email, text, and phone call to the Country Tart for advice.  Is Greek yogurt a good substitute for heavy cream?  Is wheat flour ok to use when it says to use all-purpose flour?  Can I use sundried tomatoes instead of roasted tomatoes?  Is she talking to me naked in the shower?  After confirmation that I was fine with all the substitutions, I carried on with my day. 

First I went into the post office and mailed off one of my media copies of Balanced Days, Balanced Lives to the local NPR lady who does a lunchtime show that many times involves health and nutrition issues.  Then off to the health food store, where I dropped off another media copy, and purchased some no-sodium baking powder, scallions, and feta cheese. 

This morning I made the scones.  Look!


Since I changed the recipe so much I am hereby dismissing the etsy recipe and claiming this as my own. 

Here's the recipe, with my adjustments:
~~~~~~~~~~~~~~~~~~~~~~~~~~~~~~~~~~~~~~~~~~~~~~~~~~~~~~
Sundried Tomato Feta Scones
Makes 8 scones

Ingredients:

1/2 cup wheat flour
1 1/2 cups all-purpose flour
1 tablespoon sodium-free baking powder
1/2 teaspoon garlic salt
4 Tbsp cold unsalted butter, cut into cubes
3/4 cup Greek yogurt
1 egg slightly beaten
4 oz feta cheese
1/2 cup sundried tomatoes in olive oil
2 green onions, finely sliced
Directions:

Preheat oven to 400 degrees.

Place the flour, baking powder, garlic salt and butter in a food processor. Pulsate everything in 3-second intervals until the mixture resembles coarse meal. If doing this by hand, use 2 knives, a pastry blender or your fingers.

Transfer everything to a large bowl. Stir in heavy cream and egg, mixing the dough by hand until it comes together.

Add feta cheese, roasted tomatoes, and green onions. Gently mix the ingredients by hand until the savory ingredients are evenly distributed.

On a floured surface, form a big dough ball. Flatten the dough into a 1 inch disk and cut it in 8 equal pieces.

Bake for 15 minutes on a baking stone or a baking sheet lined with parchment paper.

Remove scones from baking sheet and cool on a wire rack.
~~~~~~~~~~~~~~~~~~~~~~~~~~~~~~~~~~~~~~~~~~~~~~~~~~~~~~

I did not bother with pictures of every step.  My hands were all yucky from mixing the dough by the time I realized that a blog works better when you put pictures on it.   

First I went into the pantry for my wheat flour.  I had forgotten that I used most of it recently on another scone recipe, and only had 1/2 cup left.  So much for lowering the sodium substantially.  Next time I will make sure I have wheat flour on hand. Wish I'd checked before we went to the store.
The sodium-free baking powder did help considerably, though.  Did you know that one measley teaspoon of regular baking powder contains 488 mg of sodium?  Also 23% calcium, so it does have that to say for itself.  Since they lowered the sodium limits for people 51 and over, to 1500 mg/day, 488 mgs of sodium in one tiny ingredient in one recipe, even when you divide it by 8 servings, just isn't very appealing.  Even without the sodium-laden baking powder, this is kind of high per serving. 

nutrition facts
Anyway, these smelled incredible as they baked, and they look like they are going to rock me jailhouse rock.  We will have them later with some Beach Baked Beans I made yesterday.

Between the Frosty Paws, Scottish Oatmeal Cake, and Scones, my kitchen looks like a tornado blew through.  So I'm off to clean up now.  Have a wonderful weekend everyone!


ps:  for the Frosty Paws, I use a big container of vanilla yogurt, 2 bananas, and about 1/2 a cup of water.  Blend in the blender, then put in little tupperwares until frozen.  Like most other things, it is a whole lot cheaper to make your own than to buy the fancy ones from the store.  Also, no added chemicals.  Sadie adores them.

pps:  so much for waiting until later to try them.  I couldn't stand it anymore so I ate one.  Please make this recipe - you will not be sorry, I promise you.  They are awesome.  AWESOME!!!

Saturday, March 19, 2011

Beach Baked Beans

I am craving baked beans.  Probably because I've been low in fiber recently and my body is not in the mood for that.  Tastespotting had lots of recipes that I looked at, and settled on one for Boston Baked Beans.  I'm not even going to refer you to the blog because I ended up changing the recipe so much the blogger would never recognize it!  So I have changed the name to Beach Baked Beans (copyright Serenity Swamp).

I used the following ingredients:

  • 232 grams Jacob's Cattle beans (I logged these as Great Northern beans, because I can't find the nutritional information for Rancho Gordo beans, even though it might be on their website)
  • 4 slices of thick bacon, cut into about 1/2 inch pieces
  • 114 grams sweet onion, chopped
  • 12 grams fresh garlic, chopped
  • 2 T honey
  • 1 T brown sugar
  • 1 t of fantastic chili peppers in a tube that I buy at Harris Teeter in the produce department
  • 1/2 cup blackstrap molasses
  • 2 t hot/sweet mustard (from a Hickory Farms gift set Greg got for Christmas)
  • 1 t yellow mustard
  • 1/8 t Kosher salt, dash of black pepper
Soak the beans, drain and rinse them

Bring the soaked beans to a boil in a large pot filled with 8 cups of water.  Reduce to a simmer and cook, uncovered, until the beans are softened but fully intact, 45-60 minutes

Preheat the oven to 250 degrees

In a dutch oven, cook bacon over medium heat until crisp

Add onion and garlic and cook, stirring frequently, until translucent

Add 3 cups of the hot bean liquid, honey, brown sugar, chili peppers, molasses, mustard, salt and pepper

Bring to a boil

Drain the beans and add to the bacon/onion mixture

Cover and put in the oven for 4-5 hours until the beans are completely soft and the liquid is thickened

~~~~~~~~~~~~~~~~~~~~~~~~~~~~~~~~~~~~~~~~~~~~~~~~~~~~~~~~~
Alrighty then.  One thing I changed from the blog recipe I copied was I decided to mention that you have to put the beans in with the bacon/onion mixture before you put everything in the oven, unlike the blogger, who said nothing about it (see Lynn?  It's not just you).

While the beans cooked, I made the rest of the recipe.  First, cook the bacon until crisp.

cooking the bacon

This, my friends, is my Aunt Betty's famous cast iron baked bean pot.  Aunt Betty was one of my grandfather's 11 siblings, and she was the last of them when she died just a few years ago.  Aunt Betty made the best baked beans anyone has ever eaten.  Every year at the family picnic at her house, we could count on them being there.  Not to mention her incredible macaroni and cheese.....    After she died, the family was asked if they would like anything of hers, as they were cleaning out the house in order to put it on the market.  My brilliant sister Robin asked for Aunt Betty's bean pot for me (wait a second while I cry - that just got me all choked up.  Thank you Robin - I love you).  Robin also gave me a copy of Aunt Betty's baked bean recipe.

Come to find out, it was canned beans that Aunt Betty doctored up quite a bit, and the instructions were very unclear as to how long you were supposed to cook them.  It could have been days; there was no way to tell.  I haven't made Aunt Betty's baked beans, but I have had her bean pot on the shelf in my new kitchen on top of the cabinets.  It looks so nice up there, along with some other cast iron items like my fried chicken dutch oven and an Asian style lantern. 


Shelf decor
Today since I was already using my regular bean dutch oven to simmer the beans, I asked Greg to get Aunt Betty's bean pot down from the shelf so I could start the other ingredients cooking in it.  I had to pry the lid off of it with a butter knife and was kind of afraid to open it, but when I did, there was nothing bad in there.  This pot is so nicely seasoned!

OK - back to Beach Baked Beans. Where was I.....  right.  When the bacon is crisp, add the onions and garlic and cook until the onions are translucent.  Then put in 3 cups of the hot bean cooking liquid.  The recipe I found said to add 3 cups of water, but I had a whole lot of bean liquid so decided to use that instead of water.  Then put in all the other stuff.


Drain the beans


I drained the beans over a bowl so I could reserve the liquid in case I needed it.  It's a good thing I didn't need it, because right after I mixed the beans into the bacon and onions, I squeezed out my dish cloth right over the bean liquid bowl.  Oops.

Mix the beans into the bacon and onion mixture:


I think I have way too much liquid in here but time will tell.  I didn't use a whole pound of beans like the blog recipe did; I used the end of a bag of Jacob's Cattles I had opened a while back.  Oh well.  If it doesn't all soak up and get thick, I will remove the lid at the end and leave the beans in the oven for about 20 minutes that way.  Plus, we have honey wheat bread to go with dinner, so who really cares if they are too juicy.

Now put them in the oven for 4-5 hours.  After about 3 hours, start feeling happy because these smell so good!

They have been in the oven for almost 5 hours now, and the beans aren't quite done - very close.  I ate a bean and a tiny piece of bacon - these beans are going to be delicious!! 

There is still too much liquid in the pot so as soon as the timer goes off, I will take the lid off and put them back in the oven.  Greg will start the charcoal for the grill, and by the time the steaks are done the beans will be perfect.  That is my plan, anyway.

It's been 5 hours and I declare it time to take the lid off.  I'm getting hungry!  This is what they looked like when I took off the lid.

I wish you could smell them

nutrition facts


Yes, this will help my fiber immensely!

Well, the verdict is in.  After cooking the beans for another 1/2 an hour without the lid on, they were delicious.  A couple of things I would do differently next time: 
  • take the bacon out after it's cooked and only add it in when I add the beans
  • remove some of the bacon fat before I cook the onions
  • use an appropriate amount of liquid (or more beans in the first place - Greg said I should have doubled the recipe, they were that good!)
  • cook the beans a little longer before adding them to the recipe
Other than that these were freakin' awesome.  Slightly sweet, slightly spicy (slightly too firm beans).  I did not take a picture of the final product - it looked just a little darker and thicker than the picture above.


Saturday, March 5, 2011

Black Bean and Corn Salad


Yeah, it doesn't get much better than this.  A big spoonful of this salad over some spinach, or some brown rice or a nice grain, and you've got a whole meal!  I'm planning to eat it over nothing at first, then gradually add it into every meal until it's all gone.  It's that delicious.

I did not take pictures as I made this recipe but now I wish I had!  I pulled it together from various recipes I found online, including the vinaigrette.

Here's how I made it.

Ingredients:

Black beans    230 grams (I used Rancho Gordo, and weighed the beans after I soaked them)
Corn   268 grams (I used Del Monte no sodium added canned corn, and weighed the corn after I drained all the liquid off)
Avocado   200 grams (one whole avocado)
Red onion  125 grams (1/2 a medium red onion)
Red pepper   203 grams (one whole red pepper plus a hunk I had leftover in the fridge)
Jalapeno  18 grams (one jalapeno, ribs and seeds removed, chopped really fine)

For the vinaigrette:

Lime juice   40 grams (2 fresh limes)
Olive oil      51 grams (it looked right)
Kosher salt   1/2 t
Fresh garlic  4 grams (one clove, finely chopped)
cumin  1/2 t
honey 10 grams (one dip in my honey jar with the honey-dipping stick)
black pepper - a couple of grinds from the pepper mill


First I made the vinaigrette.  Then I chopped the avocado, and put it into the vinaigrette and stirred it around.  Next I chopped the onion and added it to the avocado in the vinaigrette.

Technically, first I cooked the beans, but I did that yesterday.  Just beans and water, nothing else.  I wanted them to be plain and soak up some of the vinaigrette.  After the beans were drained and cooled yesterday, they went into the fridge to wait until today.

I put the beans in a great big bowl, then drained the corn and added that.  I chopped the red pepper and jalapeno and threw that in, then dumped in the vinaigrette with avocado and onion, and stirred it all together.  Then I took a picture, and put the salad in the fridge.  After I finish writing this I'm going to eat a big ol' bowl of this for lunch!  I think it's going to taste even better tomorrow.

Check out the awesome stats!!  Even with 1/2 teaspoon of salt, the sodium is really low in this dish.  Cooking your own beans is worth the time it takes.

nutrition facts